Clutter Eating Monsters – Free Crochet Pattern

UPDATE 11/17/2016: It was brought to my attention that there was an error in the pattern on round 12. It should be R12: 17dc, (dc dec, 4dc) x 3, 13dc (45 sts). I have updated the PDF file to reflect the change.

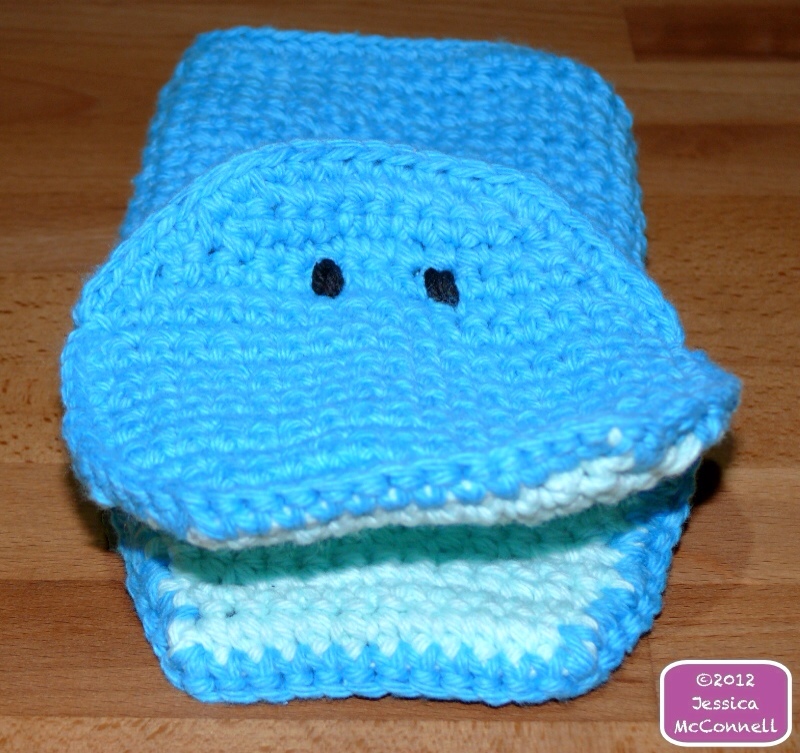
FEEEEEED MEEEE!! This little monster loves to eat plastic bags and other household odds and ends!

This guy wants to eat clutter!!

After I made my pup her dog wallet, I had to do something about the plastic shopping bags in the kitchen. They were getting out of control, and shoving them all inside another plastic bag just wasn’t cutting it. I knew the bag holder would have to visibly hang in our kitchen, so I wanted to make something cute. I ended up with this charming crochet monstrosity who just happens to have an appetite for bags!

blue crochet clutter eating monster plastic bags

MMmmMM!! Lunch bags!!!

Of course by the time I sat down to write this post there wasn’t a plastic bag in sight for the little guy to munch on. Between keeping the dog wallet stocked and making a conscious effort to remember our reusable grocery bags, the collection had long since been depleted. Plastic shopping bags are terrible for the environment anyway, so this monster has adapted to eating all sorts of miscellaneous household items instead!

He proved to be so useful that I made him a monsterette…

crochet purple clutter plastic bag eating monster

Purple Monsterette

…and baby monster to hang out with!

green crochet clutter plastic bag eating monster

I’m the baby…gotta feed me!

They love eating everything from hand towels to kitchen clutter – just don’t ask them to eat their vegetables! I personally think a giant monster would make a fabulous clothes hamper 🙂

Have some clutter of your own that needs to be eaten? Make your own Bag Eating Monster with my free PDF pattern. This pattern is for personal use only and may not be sold, reprinted, or copied in any way without my express permission. If you decide to sell something you make from one of my patterns, I ask that you give credit to me as the pattern designer. I also ask that you include a link back to the free pattern, so that others may have the opportunity to make the item themselves.

crochet plastic bag clutter eating monsters

Beware: They multiply…quickly!!

I’ve added this as a free pattern on Ravelry as well. If you’ve got a camera and a minute, pretty please upload your monster pictures. I’d really love to see the finished projects! Good luck with your own little monster(s)!

Can’t get enough of these cute monsters? Check out my Colorful Cartoon Monsters design – inspired by the creatures lurking around on the Clutter Eating Monsters PDF pattern 🙂

Crochet Bath Mitt Bear

I was recently asked to make a couple more crochet Bath Mitt Buddies, and I’m so glad too because they’re super cute and fun to make! I was really happy with how the hippo turned out before, so I decided to make another one. In case you missed it, you can make the hippo ears by following the How-To instructions from my other post.

crochet hippo bath mitt buddy smile

Happy Hippo

This time I gave him some hippo nostrils. I used the same color yarn as I did for the mouth to embroider the nostrils. I was going to try and add a of couple teeth too, but in the end I couldn’t get them to look right.

crochet hippo bath mitt buddy nostrils

Hippo With Nostrils

For his buddy, I wanted to try changing up the pattern and making a monkey. I studied the free Bath Buddies pattern from Sugar ‘n Cream for a few days before I finally figured out how I would modify the pattern. I followed the first part of the instructions as if I was making the whale. When it came time to add the chin extension, I went back and followed the instructions for the frog.After more pattern decoding, I found that if I made the frog mouth it would still line up with the top of the head, even though I had followed the hippo instructions. Yay!

So long story short: body & front of head = whale; chin extension & mouth = frog. Easy 🙂 Too keep my bath mitt from looking like a brown whale with a frog chin, I added a couple of ears. I made a minor change to my hippo ear pattern and ended up with this:

happy smiling crochet bath mitt buddy bear

This Bear Is All Smiles : )

Monkey/ Bear Ear How-To:
(make 2 using same size hook from bath mitt)

Row 1: sc, 4dc, sc into a magic ring; ch1, turn.
Pull almost all the way tight. (6 stitches)

Row 2: sc increase in each stitch; fasten off leaving
a tail long enough to use to sew onto your bath mitt buddy (12 sts)

Pull the magic ring tight, sew one ear to each side of the head just
below where it starts to slope down for a bear buddy.

Sew them right onto the point (a little higher than the bear ears) to make a monkey.

After attaching the ears it was pretty evident that the little guy looked more like a bear than a monkey, hence the post title. I think he would have looked more like a monkey if I had attached the ears a little bit higher, but either way he’s totally cute!

hanging crochet bath mitt bear buddy

Just Hanging Around

Designs From Scratch Boutique now on Zazzle!

Designs from scratch boutique Zazzle shirts craft accessories

Get your official Designs From Scratch gear from the official Zazzle store!

Whether you crochet, knit, sew, or are just plain crafty, there’s something for you in my store. There will always be new products and designs, so please check back often! I try to come up with ideas that are uniquely attractive and designs which look good on a wide variety of products. A great deal of work has also gone into making sure my online store looks good and is easy to navigate.

From time to time people ask me how they can repay me for providing free patterns, recipes, and information. The easy answer is to buy yourself a shirt or get yourself some stickers! I make a very modest amount of money off of each item sold in my Zazzle shop. I assure you as a fellow, budget-friendly crafter, I will never list anything for more than what I’d be willing to pay for.

Go ahead and check out the store! If you don’t see a product or style you’re after with the artwork on it, please just let me know. I’d be more than happy to make you a custom design!

Crochet Bath Mitt Buddies

Crochet bath mitt buddies frog whale hippo

I made these adorable bath mitts for my two young nephews who live in Germany. My husband and I love to video chat with the little guys since they live so far away. We always seem to catch them before or after their bath time, so I thought they’d enjoy having a couple buddies to play with in the tub.

I found this free Bath Buddies crochet pattern on the Sugar ‘n Cream website. I used Peaches & Creme 100% cotton yarn for both mitts. The pattern includes instructions for making both a frog and a whale version of the bath buddies. I made the frog first and followed the pattern without changing much. Rather than adding the puffy, bug-eyes, I chose to hand embroider them with some black cotton yarn instead.

Crochet frog bath mitt buddy cotton

I changed things up a little more when I made the whale. Rather than working in the round, I turned between each row on the main piece. That way the body matched the row turns on the head and chin extension pieces, and the whole thing looked uniform. I really liked how the bath mitt looked with the turns, but they’re both so incredibly cute! After I finished the whale, I took a step back and felt like something was missing from the little guy. His eyes were sewn on, all the yarn ends were hidden, but he just didn’t look complete. Then it hit me.

Cotton crochet whale bath mitt buddy

EARS! The whale didn’t look quite finished because he was actually a hippopatamus! He just needed some hippo ears.

Crochet cotton hippo bath mitt buddy

Since the pattern obviously didn’t come with instructions on how to make ears, I had to create my own. After a bit of trial and error, here’s what I came up with:

Crochet hippo ears how-to

Hippo Ear How-to:

R1: sc, dc, 2tr, dc, sc into a magic ring; pull tight into a half-oval; ch. 1 turn (6sts)

R2: 2sc, 2sc increases, 2sc; fasten off – leave enough yarn to sew ear to head (8sts)

Repeat for second ear.

Sew one ear to each side where the head edging starts to slope down.

This bath buddy is ready for his trip around the world!

Crochet frog bath mitt buddy cotton


UPDATE: These little guys were so cute I was asked to make more! This time around I made another hippo and a bear. Check them out here in my new post which includes a new how-to for the bear ears.

happy smiling crochet bath mitt buddy bear

This Bear Is All Smiles 🙂

Crochet Dog Wallet – Free Crochet Pattern

Crochet dog bag holder wallet loop clip

It’s no secret that dog is man’s best friend. Sometimes our furry companions show us their love by leaving some not-so-special “treats” while out for a walk. It’s easy to forget to grab a plastic bag on the way out the door and, take it from me, it’s not cool when you do! I came up with this Crochet Dog Wallet so that I’d never be without a way to retrieve Rover’s precious gifts.

I made the wallet a little bit stretchy so that I could cram quite a few bags inside of it. This way I don’t have to remember to refill it every other day! The front opening is partially sewn shut on each side to keep the bags from bursting out.

Crochet dog bag holder wallet

I also added a small loop to one corner of my doggie wallet so I could clip it to the dog’s leash or my backpack. The loop could easily be lengthened to make a “doggie wristlet,” so you can keep your hands free on those long walks.

Crochet dog bag holder wallet heart embellishment

Ready to make a wallet of your own? Here is the Free PDF pattern for my Crochet Dog Wallet! You can also find this pattern on Ravelry! This pattern is for personal use only and may not be sold, reprinted, or copied in any way without my express permission. If you decide to sell something you make from one of my patterns, I ask that you give credit to me as the pattern designer. I also ask that you include a link back to the free pattern, so that others may have the opportunity to make the item themselves. Enjoy and happy crocheting!

UPDATE: After making this dog wallet I needed something else to hold the rest of our plastic shopping bags. I crocheted a bag eating monster to devour them all. Of course by the time he was finished, our bag collection was pretty much extinct (from all the wallet refills!). So he adapted to eating all kinds of household clutter instead! I’ve added the free PDF pattern here, but beware – they multiply!!

crochet plastic bag clutter eating monsters

Beware: They multiply…quickly!!

Crochet Broomstick Lace With a Highlighter

Crocheted Broomstick Lace Purse Handles

Crochet Broomstick Lace Handles

Can you believe this delicate, crochet broomstick lace was made using only acrylic yarn, a crochet hook, and a large highlighter?! I chose broomstick lace for the handles of my Orchid Crochet Purse From Scratch. The straps turned out so well I just had to share the technique! I originally found Sandra from Crochet Cabana‘s tutorial on how to crochet broomstick lace. The only thing? I didn’t have a “jiffy” hook or even a thick knitting needle like Sandra suggests. Feeling crafty, I decided to improvise. Since the hook Sandra uses in her tutorial looks like an oversized pen, I searched the house for something suitable. The closest thing I could find was a permanent marker, but it proved to be a bit too small.

Crochet Broomstick Lace using a permanent marker

Permanent Marker = Too Small

Since the marker wasn’t right for the job I kept trying. I got it right on the second try when I used a thick highlighter. The holes of the broomstick lace ended up being nice and big due to the highlighter’s large diameter. I began my handles with a foundation chain of five. This produced one lace loop per row and allowed me to build my rows up to the length I wanted for my strap. I used a size G/ 4.25mm hook for my broomstick lace, but you can always experiment and choose the hook that is right for your tension and/ or yarn.

Crochet Broomstick lace with a highlighter

Highlighter = Just Right!

I was a little nervous to attempt this stitch since it looks so complicated, but it ended up being a lot easier than I thought! When I finished the straps my husband asked if they were going to be strong enough to hold up such a large purse. That’s the beauty though, the lace only looks fragile! In reality it’s actually quite a durable stitch, as so much yarn goes into each loop of lace. My broomstick lace handles were the perfect addition to my basic Orchid Purse.

I’m absolutely in love with broomstick lace! It’s so pretty and simple to make. What’s your favorite use of broomstick lace? Have you ever turned random household objects (like highlighters) into crafting tools?

Crochet Broomstick Lace with a Highlighter

Iced Orange-Berry-Limeade

Icedorangeberrylimeadedrink

It’s been so hot around here that my husband and I have been looking for ways to cool down. What better way to beat the heat than with a nice cold drink? Lemonade sounded really good, but all we had were limes, oranges, and wild blackberries. Still craving that frosty beverage, we decided to give it a shot despite our lack of lemons. The result? This delicious Iced Orange-Berry-Limeade!

Icedsummerbeveragefreshfruit

Iced Orange-Berry-Limeade
1-2 fresh limes (to taste)
1 fresh orange
2 dozen fresh berries (I used wild blackberries)
Ice cubes
Water

  1. Squeeze the lime(s) and orange into a large glass. It helps to use a fork to break apart the inside of the lime.
  2. In a separate bowl, mash up the blackberries. Pour the mashed pulp into a strainer and let all the juice drain into the glass.
  3. Add in your ice cubes.
  4. Top off the rest of your glass with water. Use sparkling water or a soft drink instead (ex. ginger ale, Sprite) to make it fizz. Makes one large drink.

One sip was all it took to fall in love. It was so hard not to finish the whole glass in one gulp! I wish we had enough fresh fruit to make a whole pitcher (or five). You can even customize this icy drink by using your favorite fruits. Don’t be afraid to experiment either. When it comes to making fresh fruit juice, you really can’t go wrong!

HomemadeIcedorangeberrylimeade

What’s your favorite way to find relief when it’s hot outside?

Crochet Clutch Purse – Free Pattern

Blue crochet clutch purse with flap

Want to make a cute Clutch Purse of your own? Check out the free pattern below!

A couple of weeks ago I started making the Crochet Posey Purse from Red Heart. I was halfway through the project when I came up with an idea for a smaller clutch-type purse. Since I tend to get really excited when I come up with an idea, I had to try it out right then. So I put my posey purse on the back burner, grabbed some pretty blue yarn from my stash and set to work on the clutch I had dreamed up.

After a couple of mini-prototypes and one full-sized fail I finally got it right. I was so excited with how it turned out. It was exactly like I had imagined. I couldn’t keep it to myself, so I wrote up a pattern. Creating the pattern ended up being harder than making the purse itself. Half the time I still have trouble even reading crochet patterns, let alone writing them!

Crochet pattern corrections

I turned to the Ravelry community to check my pattern writing “skills.” If you haven’t heard, Ravelry is basically the Facebook for yarn lovers – except better! When I asked for an extra set of eyes to go over my pattern, I almost immediately got helpful responses. Sandy of Sandy’s Cape Cod Originals offered to take a look at what I had come up with. Kindly, she made many corrections, gave me great tips, and a lot of feedback. Sandy has over 30 years of experience crocheting and sells hundreds of crochet patterns on Etsy and Ravelry. I’m so grateful for all of her help.

Blue crochet clutch purse with flap and strap

After all was said and done I decided to offer the pattern for free both on my blog (see below) and on Ravelry. Please note that this pattern is for personal use only and may notbe sold, reprinted, or copied in any way without my express permission. If you decide to sell something you make from one of my patterns, I ask that you give credit to me as the pattern designer. I also ask that you include a link back to the free pattern, so that others may have the opportunity to make the item themselves. I’d love to see what you come up with! Let me know what you think! Good luck and happy crocheting!

Free PDF pattern download: Crochet Clutch Purse

Crunchy Granola Goodness

CrunchyGranolaGoodness

So Good, So Crunchy

There are a million and a half ways to do granola: soft, crunchy, chewy, even “bar” form. Don’t even get me started on all the possible flavor combinations either! I have to admit I love all things granola, but it can sometimes be expensive, or if you buy the wrong kind, like eating cardboard. The “high price, low taste” thing is really weird because it’s so easy to make! Granola is hard to mess up too. Even if the consistency isn’t exactly right, it still (usually) tastes good.

It’s also the perfect dairy and gluten free snack (yay, something I can actually eat!). It can be really difficult to find tasty cereal when you don’t eat gluten, so I usually go with granola. Since good granola can be hard to come by, I thought I’d share my version. This granola recipe is part Better Homes and Gardens, part experimentation and part “accident,” but it’s all good!

As the name suggests this recipe produces crispy, crunchy granola that goes great with milk (or if you’re me- milk alternatives). I spread my granola out on a baking sheet to keep the chunks small and “cereal-like,” but it could easily be shaped into thin bars. This recipe makes approximately 6 cups of yummy granola. Any less than that and it’d probably be gone in one sitting!

Crunchy Granola Goodness Recipe
4 c Gluten Free Oats
1 c Nuts (I used walnuts, pecans and almonds)
1/2 c Flax Seeds (or milled flax seeds)
1/2 c Agave
1/2 c Maple Syrup
1/3 c Oil (I used olive oil)
1/3 c Almond (or other nut) Butter
1-2 tbs Ground Cinnamon
1/4-1/2 c Dried Cranberries

  1. Combine all ingredients* in a large bowl and mix until all the dry ingredients are “wet.”
  2. Spread the mixture out onto two greased 15x10x1″ baking sheets. This will result in small granola clusters that are great for snaking or as a cereal substitute.
  3. Bake at 300 degrees (F) for 50 to 55 minutes. Most recommend turning the granola after about 20 minutes, but I like to just let it bake untouched.
  4. Remember to keep an eye on it towards the end and make sure it’s not burning!

*Note: If you are using something other than dried cranberries you may want to wait to add any dried fruit until you are done baking. I made the mistake of making this with raisins and they all burnt to a crisp within 5-10 minutes of baking. It was a weird batch to say the least!!

crunchy granola

The ingredients listed in this recipe are simply what I had on hand. Try adding other nuts or dried fruit. Some great additions to granola are: cashews, sunflower seeds, peanuts, pumpkin seeds, raisins, dried blueberries or strawberries, banana chips, honey, brown rice syrup… Ok, you get it right? The possibilities are endless!

The last time I made this I crammed all the granola onto one baking sheet and made the whole batch at once. I baked it for the full 55 minutes because it was all packed together. It was still a little bit softer than I was going for, so I threw it back in the oven for another 5 minutes. The result was a giant granola bar! Since I’m not a giant myself, I broke it all up into small chunks, yum! How do you like your granola? My favorite is with almond milk!

crunchy granola with almond milk

Granola with Almond Milk

Barstool Booties

An epic battle has been going on in my house. Well maybe not, but our bamboo flooring and barstools from Ikea just don’t seem to want to get along. At all. Each day they’ve gone head to head, and the floor’s been loosing miserably. I knew I had to do something to stop the barstools from continuously marking their territory, but I just couldn’t decide what to do.

There was the option of buying some of those little felt pads to stick to the bottoms of the feet, but I really don’t like the look of them. I also prefer to handmake everything when possible. I finally decided to sew up some little socks out of fabric scraps, but kept putting it off.

Then as if they read my mind, Red Heart released this Protect-Your-Floor Sock pattern. I rejoiced inside at seeing the solution to my problem! My excitement was cut short when I saw that the pattern was for knitting, not crochet.

Not one to be discouraged I nixed the sewing idea, and decided to make my own crochet version. Follow this tutorial to make some booties of your own for your barstools or chairs!

Begin by making a slipknot, then chain (ch) three, slip stitch (Sl st) to first ch.

You should now have a tiny circle. Ch 1 to start a new row. Single crochet (sc) around the outside of your circle until you get back to the beginning of the row you just made. Sl st the loop on the hook to the first sc.

Contintue adding rows of sc until you end up with a tiny circle that is just bigger than the foot of your barstool or chair.

Next, ch 1 as if you were going to start a new row. Sc through each inner loop until you’ve gone around the whole circle, and Sl st to join.

Again, ch 1 and add another row on top of the previous row. If you sc through both loops, your bootie will build straight upwards. However, if you continue to sc through the inner loops, it will make for a more tapered effect (I went with the taper).

There you have it. Barstool booties to protect the pretty flooring! Customize them by using different colors or making them taller. Let me know what you come up with!!

P.S. This is my very first tutorial, so let me know what you think! Feel free to ask questions and leave comments!