Barstool Booties

An epic battle has been going on in my house. Well maybe not, but our bamboo flooring and barstools from Ikea just don’t seem to want to get along. At all. Each day they’ve gone head to head, and the floor’s been loosing miserably. I knew I had to do something to stop the barstools from continuously marking their territory, but I just couldn’t decide what to do.

There was the option of buying some of those little felt pads to stick to the bottoms of the feet, but I really don’t like the look of them. I also prefer to handmake everything when possible. I finally decided to sew up some little socks out of fabric scraps, but kept putting it off.

Then as if they read my mind, Red Heart released this Protect-Your-Floor Sock pattern. I rejoiced inside at seeing the solution to my problem! My excitement was cut short when I saw that the pattern was for knitting, not crochet.

Not one to be discouraged I nixed the sewing idea, and decided to make my own crochet version. Follow this tutorial to make some booties of your own for your barstools or chairs!

Begin by making a slipknot, then chain (ch) three, slip stitch (Sl st) to first ch.

You should now have a tiny circle. Ch 1 to start a new row. Single crochet (sc) around the outside of your circle until you get back to the beginning of the row you just made. Sl st the loop on the hook to the first sc.

Contintue adding rows of sc until you end up with a tiny circle that is just bigger than the foot of your barstool or chair.

Next, ch 1 as if you were going to start a new row. Sc through each inner loop until you’ve gone around the whole circle, and Sl st to join.

Again, ch 1 and add another row on top of the previous row. If you sc through both loops, your bootie will build straight upwards. However, if you continue to sc through the inner loops, it will make for a more tapered effect (I went with the taper).

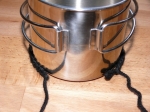
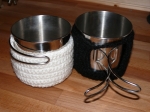
There you have it. Barstool booties to protect the pretty flooring! Customize them by using different colors or making them taller. Let me know what you come up with!!

P.S. This is my very first tutorial, so let me know what you think! Feel free to ask questions and leave comments!

Single Crochet Mug Cozy

After thoroughly practicing the single crochet stitch I was ready to move on to a real project. Endless hours of searching later and I just couldn’t decide what I wanted to make with my acrylic Red Heart yarn. I took a break from searching to browse some of my favorite craft blogs for inspiration. I ended up finding this crochet cup cozy tutorial by Stephanie from All About Ami. Stephanie’s cute pictures had me “hooked” (hehe, I couldn’t resist!) and I knew just the mugs I wanted to use.

Our mugs

I love our stainless mugs. They hold a good amount of liquid and have cool flip out handles! Since they’re metal, they tend to really heat up when filled with a warm beverage. The mugs get so hot that you can expect to get burnt if you don’t pick them up by the handles. I’m definitely not a fan of getting scorched, but I usually prefer to hold the whole mug in my hand. I knew I had found the perfect solution when I saw Stephanie’s cup cozy tutorial.

As instructed, I started off with a chain that was slightly longer than the circumference of my mug. After crocheting a few rows I held the piece up to my mug. I should have checked a lot sooner because the piece wrapped around past the handles. Rookie mistake. Don’t you just hate when that happens?!

Too long

Since it was too long, I pulled the whole thing apart and started over. For the next attempt I tried making the chain just a bit longer than the handles. A couple rows later and it was clear that once again it was too long. Then I made the chain end right at the handles, but that wouldn’t allow room for rows up and down the sides. The porridge was just right when I made the chain end just short of the handles.

My yarn after a few do-overs

Shorter chain

The main part of the cozy was so simple that I completed it in no time. It was smooth sailing until I tried to connect the two edges. Apparently my connecting chain wasn’t snug enough because the section became all loose and wonky looking when I added another row.

Too loose

I tried once again, made sure it was nice and snug, and had no further complications! I couldn’t decide on a button to use from my dwindling collection, so I just slip stitched the row of chains to the opposite edge above the mug handles.

Finished!

Since the metal mugs tend to sweat when they’re filled with cold beverages, I decided to add a bottom to my cozy. I made the bottom by single-crocheting rows of decreasing circles. To close up the center, I slip stitched the loop on the hook to a loop directly across from it in the circle. I continued to slip stitch opposing loops until the middle was closed up.

With a bottom

With a friend

Stephanie’s cup cozy pattern is super simple to make. Her instructions (and awesome pictures) make it a great project for beginners! Even with my many mistakes extra practice, this mug only took me a couple hours to complete!

Crochet-Happy

My husband and I recently moved across the country. My mom crocheted us an awesome blanket as a going away present. Right before we left, she gave me a crochet hook and showed me how to weave the yarn ends back into the work to hide them if they came loose.

My mom’s been crocheting for as long as I can remember. For some reason the thought of learning to crochet only popped into my head AFTER moving over 3,000 miles from her. Yeah, real smart! Owning a craft tool that I didn’t know how to use was really eating at me. I was absolutely determined to conquer the art of crochet.

I had my hook and some yarn, but just thinking about all those loops and stitches had my brain in knots! Without my mom close by I wasn’t sure where to begin. I did the next best thing and I asked my pal google for tips on “how to crochet.” I quickly found that learning this new skill by looking at step-by-step pictures was just not working for me. The directions might as well have been in a different language and the diagrams only further added to my confusion.

I was ready to pull my hair out when I finally came across this great video tutorial by Polka Dot Posh. The video shows the basic single crochet stitch as well as a tutorial for a pot holder. The instructions are so easy to follow and the camera angle is just right!

I didn’t end up making the whole pot holder (I didn’t think the acrylic yarn I was using was appropriate), but it was a fun way to learn and practice.

The whole time I was practicing, I kept wondering why it had taken me so long to even attempt to crochet. It ended up being so much easier to understand than I had ever thought! I can’t wait to learn more crochet stitches!!

Do you crochet? If so, how did you learn? Have you ever put off learning something only to find it wasn’t as bad as you thought?

New blog, New beginning

I have always loved making things from scratch. One great thing about making things yourself is that you know what goes into the item, as well as the quality of the item. It just seems like these days quantity wins over quality. This is why when I can, I prefer making things from scratch. Whether I’m cooking, sewing, crocheting, cutting-and-pasting, or crafting, chances are it’s going to be made from scratch…

I started this blog so that I could share my many ideas, projects and recipes. If you find something you like, please let me know. I love hearing from you! Enjoy!